Step 1: Log in via SSH and Update your System
First, you will need to log in to your Ubuntu 20.04 VPS via SSH as the root user:
ssh root@IP_ADDRESS -p PORT_NUMBER
Next, run the following commands to upgrade all installed packages on your VPS:
apt-get upgrade -y
apt-get update -y
Step 2 : Install Apache and PHP
Nextcloud runs on the webserver and PHP-based application. So you will need to install the Apache webserver, PHP and other required PHP extensions in your server. You can install all of them with the following command:
apt-get install php7.4 libapache2-mod-php7.4 php7.4-xml php7.4-cli php7.4-cgi php7.4-mysql php7.4-mbstring php7.4-gd php7.4-curl php7.4-zip php-imagick php7.4-json php7.4-intl php7.4-fpm php7.4-bcmath php7.4-dev php7.4-common
apt-get install libmagickcore-6.q16-6-extra redis-server memcached php7.4-memcacahed php7.4-memcacahe php-redis
Once all the packages are installed, verify the PHP version using the following command:
php -v
You should see the following output:
 PHP 7.4.3 (cli) (built: May  5 2020 12:14:27) ( NTS )
 Copyright (c) The PHP Group
 Zend Engine v3.4.0, Copyright (c) Zend Technologies
 with Zend OPcache v7.4.3, Copyright (c), by Zend Technologies
Step 3 : Install and Configure MariaDB
Nextcloud uses MariaDB to store information. You can install the MariaDB server and other packages with the following command:
apt-get install mariadb-server mariadb-client unzip wget -y
Once installed, secure the MariaDB installation by running the following command:
mysql_secure_installation
Answer all the questions as shown below to set the MariaDB root password and secure the installation:
 Enter current password for root (enter for none):
 Set root password? [Y/n] Y
 New password:
 Re-enter new password:
 Remove anonymous users? [Y/n] Y
 Disallow root login remotely? [Y/n] Y
 Remove test database and access to it? [Y/n] Y
 Reload privilege tables now? [Y/n] Y
Once the MariaDB is secured, log in to the MariaDB console with the following command:
mysql -u root -p
Provide your root password when prompt then create a database and user for NextCloud with the following command:
MariaDB [(none)]> CREATE DATABASE nextclouddb;
MariaDB [(none)]> GRANT ALL PRIVILEGES ON nextclouddb.* TO 'nextcloud'@'localhost' IDENTIFIED BY 'your-password';
Next, flush the privileges and exit from the MariaDB console with the following command:
MariaDB [(none)]> FLUSH PRIVILEGES;
MariaDB [(none)]> EXIT;
Step 4 : Install Nextcloud
At the time of writing this article, the latest version of Nextcloud is 18.0.4. You can download it from the Nextcloud’s official website using the following command:
wget https://download.nextcloud.com/server/releases/nextcloud-18.0.4.zip
#### 最新版部分插件不支持,自由选择
wget https://download.nextcloud.com/server/releases/nextcloud-23.0.1.zip
Once the download is completed, unzip the downloaded file to the Apache root directory:
unzip nextcloud-18.0.4.zip -d /var/www/html/
Next, change the ownership of the nextcloud directory to www-data:
chown -R www-data:www-data /var/www/html/nextcloud
Step 5 : Configure Apache for Nextcloud
Next, create a new Apache virtual host configuration file to serve the Nextcloud:
nano /etc/apache2/sites-available/nextcloud.conf
Add the following content:
 <VirtualHost *:80>
 DocumentRoot "/var/www/html/nextcloud"
 ServerName your-domain.com
 ErrorLog ${APACHE_LOG_DIR}/nextcloud.error
 CustomLog ${APACHE_LOG_DIR}/nextcloud.access combined
 <Directory /var/www/html/nextcloud/>
 Require all granted
 Options FollowSymlinks MultiViews
 AllowOverride All
 <IfModule mod_dav.c>
 Dav off
 </IfModule>
 SetEnv HOME /var/www/html/nextcloud
 SetEnv HTTP_HOME /var/www/html/nextcloud
 Satisfy Any
 </Directory>
 </VirtualHost>
Save and close the file. Then, enable the Apache virtual host configuration file with the following command:
a2ensite nextcloud.conf
Next, enable the required Apache modules with the following command:
a2enmod rewrite headers env dir mime setenvif ssl
Finally, reload Apache for the changes to take effect.
systemctl restart apache2
Step 6 : Access Nextcloud Web UI
At this point, Nextcloud is installed and configured. Now, open your web browser and type the URL http://your-domain.com . You will be redirected to the following screen:
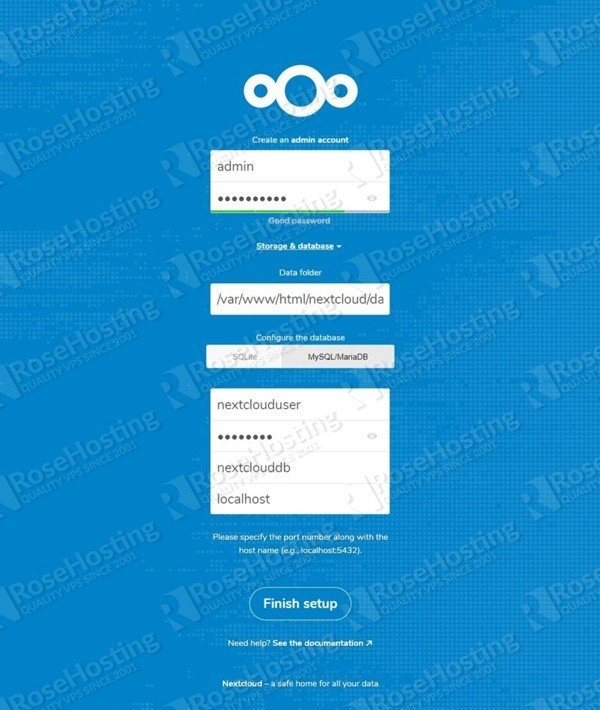
Set your Nextcloud admin username, password, data folder, database name, database username, password, and click on the Finish setup button. Once the installation has been finished, you should see the Nextcloud dashboard in the following screen:
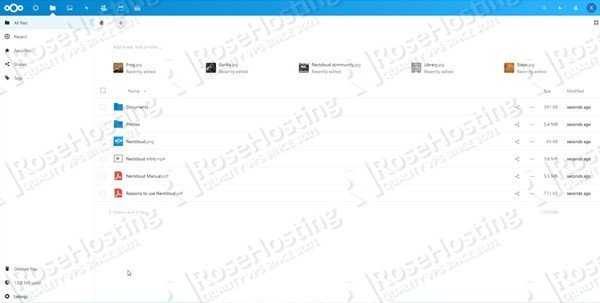
Congratulations! you have successfully installed Nextcloud 18 on Ubuntu 20.04 VPS. For more information, visit the Nextcloud official documentation.
可使用Nginx 替换 Apache
参考连接及配置 :
https://docs.nextcloud.com/server/23/admin_manual/installation/nginx.html
nextcloud安装onlyoffice
安装和使用
(tips:也可以使用collabora online),此处我们使用的是onlyoffice
去官网下载相应的插件:https://apps.nextcloud.com/categories/office ,插件放入docker拉取的nextcloud中:进入其容器,放入/var/www/html/apps,刷新即可,然后去nextlcoud激活onlyoffice插件
下好插件后,我们需要配置onlyoffice的服务,docker拉取一个onlyoffice的服务,创建一个容器,将ip和端口输入到nextcloud-设置下面的onlyoffice的服务器设置中填入文档编辑服务地址
使用如下命令创建容器:
docker run -i -t -d -p 9090:80 onlyoffice/documentserver
或者创建时添加数据卷:
docker run -it --name offices -d -p 9091:80 -v /app/onlyoffice/DocumentServer/logs:/var/log/onlyoffice \
-v /app/onlyoffice/DocumentServer/data:/var/www/onlyoffice/Data \
-v /app/onlyoffice/DocumentServer/lib:/var/lib/onlyoffice \
-v /app/onlyoffice/DocumentServer/db:/var/lib/postgresql \
onlyoffice/documentserver
踩坑
踩坑1:Host violates local access rules
登入nextcloud,修改config.php文件,文件尾部添加:'allow_local_remote_servers' => true,
官方文档 :https://docs.nextcloud.com/server/23/admin_manual/issues/general_troubleshooting.html#service-discovery
安装原文:https://www.rosehosting.com/blog/how-to-install-nextcloud-on-ubuntu-20-04/
参考:
https://www.cnblogs.com/cooper-73/p/13083161.html
https://www.cnblogs.com/sillage/p/14566963.html
安全警告处理 :
https://www.bilibili.com/read/cv9817730
https://www.daimajiaoliu.com/daima/479b09a9d900400
没有评论